the site
NewsAbout Stefan
3D section
PoserPixels:3D
Cinema4D
Misc
Music ProjectsSoftware
iBook
Material Room - beyond the first step, part 2
note: I am using a German operating system, which is why there is a comma instead of a point as a decimal separator in my screenshots. If you are on an English operating system, you will need to use a point instead.
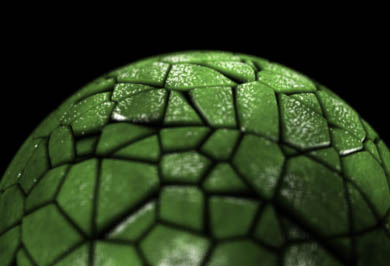
Completed my first Material Room tutorial? Then welcome on board, this time we're going to build a more complex shader: Reptile scales. Again, like last time, make sure you have enabled displacements in the render settings, and create a simple ball prop to start with.
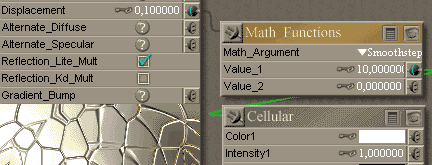
First, start with creating a 3d textures/cellular node. Adjust it a little to get it closer to the desired output - set the scale to 0.2 and increase jitter to 1.0 to get a random pattern. Then plug it in the displacement channel and reduce the channel's value to 0.1. Note how the bright parts in the displacement map push the surface outwards and the dark parts leave it where it is.

In order to emphasize the scale effect, you'd need a stronger contrast between the dark and the bright parts, with a strong tendency towards the brighter parts. There would be several ways to do this, my recommendation is that you plug a math_function node between the cellular node and the displacement channel and set it to "smoothstep" mode. Then increase Value_1 of that node to 10.
What does the smoothstep node do? First, smoothstep only outputs values beween 0 and 1. When the input value is less or equal to 0, it returns 0. When the input value is equal to or more than 1, it returns 1. In between them, it returns a value between 0 and 1 (although not exactly the same value you gave it on the input, it is "smoothing" it a little).
By multiplying it by 10 first (all the values you set on the math node's input are being evaluated before the node itself), the smoothstep function here gets values between 0 and 10 (white equals 1, and 1*10 = 10). The lower part will come out as values between 0 and 1, but most of the output will be cut of at 1.0, now resulting in a displacement much better suited to scales.
Now for the colors. Simply setting the color to a dark green would be too simple, a more sophisticated look is required. The gaps between the scales should be dark instead, and the scales themselves should have slight color variations.
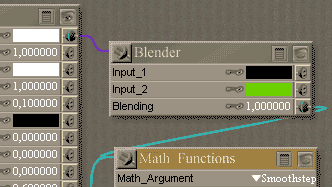
Add a math/blender node. Set its first color to black and the second color to green. Set blending to 1.0 and plug the output of the smoothstep function in the blending channel. Plug the output of the blender node in the Diffuse_Color of the root node. If you haven't done so already, render to see your result.
Too add some variation to the green, create a 3d textures/fBm node and plug it in the green color of the blender node.
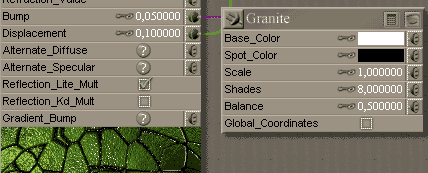
The scales are a little smooth, they need more structure. Create a 3d textures/granite node, increase its shades value to 8 and plug it in the bump channel of the root node. Set the bump value to 0.05. At this point, you may want to decrease the min shading rate in the render settings to get more detail in your renders. Set it to somewhere between 1.0 and 0.5.
Looks good already? Not perfect yet, you may have noticed that there are highlights in the dark areas. Therefore, connect the output of the smootstep function to the Specular_value of the root note. Depending on your taste, you may also want to get sharper highlights on the matieral: Set the Specular_Value to 5and the Hightlight_Size to 0.02.
Finally, zoom a little closer in your object, bump your render settings (how about some depth of field with that?) and enjoy! Wonder how this would look on the Millenium Dragon...